 Jam Jam
What is mastering?
Mastering is the last step before release. You take the finished stereo mix and prepare it to sound right everywhere: on headphones, a phone, in a car, and after the platforms have encoded it. The work applies to the whole track seen as one piece: its tonal balance, its loudness, the width of the stereo image and the maximum level it must never exceed. It is not mixing. Mixing balances the individual tracks against each other, while mastering no longer has access to them: it cannot lift a buried vocal. That is why mastering corrects little and enhances what is good, and does not rescue a bad mix. A good master gives a clearer sound, a level that sits with other releases, a stereo image that holds up in mono and no distortion added by encoding.
What mastering does, step by step
The tools change, the order of concerns stays the same.
-
Tone
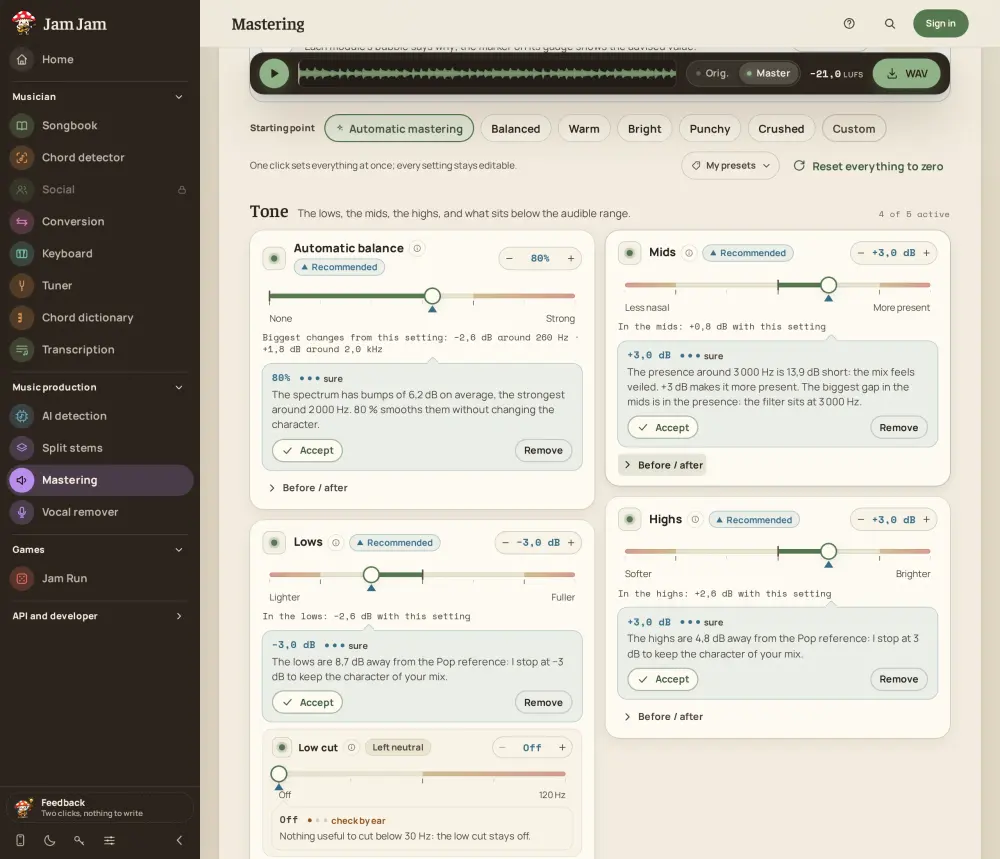
An equaliser softens what is muddy in the lows, nasal in the mids or harsh in the highs, and gently lifts what is missing, usually by a few decibels.
-
Sibilance
Piercing "s" sounds and cymbals tire the ear once the level goes up, and are softened without dulling all the highs.
-
Dynamics and loudness
Compression narrows the gap between quiet and loud passages so the perceived level can rise, but too much flattens the track.
-
Stereo image
You widen a narrow mix, keep the bass in the centre and check mono compatibility.
-
Limiter, true peak and export
The true peak is the value the signal reaches between two samples once converted or encoded. It can exceed 0 dB even when the samples stay below it, hence a ceiling under 0 dB. Then comes the export, with dither if you go down to 16 bits.
Loudness targets by platform
Loudness is measured in LUFS (Loudness Units relative to Full Scale), following ITU-R BS.1770. Most platforms measure each track and adjust its gain at playback toward a target, so listeners do not touch the volume between songs. Integrated loudness is the average over the whole track and is the one platforms aim at; momentary (0.4 s) and short-term (3 s) loudness show how it moves, and the loudness range (LRA, in LU) sums up the gap between quiet and loud passages. Spotify recommends -14 LUFS integrated with -1 dBTP at most, and -2 dBTP if the master is louder than -14 LUFS. A quick calculation shows what is at stake: a master at -8 LUFS is turned down by about 6 dB on Spotify, so you crushed the dynamics to gain a level the platform takes straight back. Aim at the target, not at the limit.
| Platform | Target | True peak | Source |
|---|---|---|---|
| Spotify | -14 LUFS integrated | -1 dBTP (-2 above -14 LUFS) | published by Spotify |
| Apple Podcasts | -16 LKFS, plus or minus 1 dB | -1 dBFS | published by Apple |
| Apple Music | about -16 LUFS | not published | observed by third parties |
| YouTube | about -14 LUFS | not published | observed by third parties |
| Deezer | about -15 LUFS | not published | observed by third parties |
| Broadcast radio and TV (Europe) | -23 LUFS | -1 dBTP | EBU R 128 recommendation |
Sources: support.spotify.com/artists/article/loudness-normalization, podcasters.apple.com/support/893-audio-requirements and tech.ebu.ch/docs/r/r128.pdf. The three observed rows are third-party measurements: treat them as landmarks, not guarantees. Clubs have no standard, everyone aims louder.
Master for free with Jam Jam
Jam Jam Mastering does this work in your browser, without uploading your file and without sign-up, at jam-jam.org/app/mastering. Free to use: adjust, listen again, compare at equal volume and download your WAV.
The method in five steps
- Drop a finished mix Drag in a WAV, FLAC, MP3 or OGG up to 10 minutes. When you have the choice, use the WAV of your mix: you do not master a file that is already encoded.
- Let automatic mastering propose, or pick a starting point Automatic mastering sets each setting and explains why, and you accept, adjust or remove each choice. Balanced is the most neutral starting point, Warm softens a harsh mix, Bright lifts a dull one, Punchy pushes the level and Crushed is a deliberate style effect.
- Adjust by ear at equal volume Switch between Original and Mastered, turn on “At equal loudness” to judge the sound and not the volume, and bypass a setting to hear what it adds. The live readings (LUFS, true peak, stereo correlation) tell you what the ear does not.
- Choose your listening target Spotify and YouTube are at -14 LUFS, Apple Music at -16, Deezer at -15, podcast at -16 and club at -9. The marker shows how far the track is above or below the target.
- Download your WAV Choose 16 or 24 bits, both with dither. The file is built on your device with the settings as they were when you clicked.
Common mistakes
Seven mistakes come up again and again:
-
Mastering a mix that is not ready
A buried vocal or muddy bass belongs in the mix, not in mastering.
-
Aiming for maximum loudness
Platforms turn down what exceeds their target, and you sacrificed the dynamics for nothing.
-
Comparing at different levels
Louder always sounds better, so compare at equal volume.
-
Ignoring the true peak
A master glued to 0 dBTP can distort once encoded to MP3, AAC or Ogg, so keep at least -1 dBTP.
-
Starting from an already compressed file
A mastered MP3 re-encoded adds two layers of loss, so start from a WAV.
-
Pushing everything
Several decibels of EQ, an extreme width or heavy saturation hide a mix problem, and an over-wide image collapses in mono.
-
Not listening elsewhere
Test the result on a phone, a cheap speaker, headphones and in a car before you publish.
Going further: Advanced Mastering
When you have the separate tracks of your song, or only the finished song, Advanced Mastering covers the whole chain in the browser: separation into stems (vocals, drums, bass, other), an automatic mix that proposes a setting per stem and explains each choice, fusion of the stems into a single mix with the headroom mastering needs, mastering of that mix, then export. Separating a finished song runs on your device first, without the file leaving it, when your browser and device allow it; otherwise it falls back to Jam Jam’s servers. It needs an account; dropping your own stems stays possible with no account.
Want to do it from a script or an assistant? Read our guide to the audio mastering API.
Frequently asked questions about mastering
What LUFS should I aim for on Spotify?
-14 LUFS integrated with a true peak of -1 dBTP at most, according to Spotify’s help page for artists. If your master is louder than -14 LUFS, keep the true peak under -2 dBTP.
Do I need a different master for each platform?
Not necessarily. Platforms mostly turn down tracks that are too loud, so a master around -14 LUFS with a peak margin suits most of them. A louder, dedicated master can serve a specific use such as a club.
Does a louder master sound better?
It seems better when played louder, and that is a trap. At equal volume, a more dynamic master is often more pleasant, and on platforms that normalise the louder one gets turned down anyway.
Can I master for free without signing up?
Yes, with Jam Jam: open the tool in your browser, drop your mix and download the WAV without creating an account.
Does automatic mastering replace an engineer?
It does the basic job well: balancing the spectrum, controlling sibilance, reaching a consistent level, and it explains each choice. It does not replace an engineer’s ear on a difficult mix. Always compare at equal volume.
Can you split a song into stems and mix it before mastering it?
Yes, with Advanced Mastering: the song is split into stems, mixed stem by stem with an automatic mix, fused, mastered and exported. Separating a finished song runs on your device first, without the file leaving it, when your browser and device allow it; otherwise it falls back to Jam Jam’s servers. It needs an account; you can also drop your own stems, with no account.

Try it on your own mix: Jam Jam Mastering is free in your browser, and your file stays on your device.